Insights
How we organize our Figma projects (and how you can organize them too)
Having your design projects in order is important. First of all because in design agencies you hardly ever work alone. All team members should be able to locate and understand a file quickly, applying just logic, and work on it without any help. But even if you are a freelance designer living in perfect harmony within your own chaos, applying a certain logic to the way you store your work is always important: because what often initially seemed to be a design that only you were going to work on, ends up becoming a collaborative project where more and more people come in to work on it, or where suddenly the client asks to have access to present or share it.

So order is important. But not all web design tools pay due attention to it. This is where Figma stands out from other similar options like Sketch or XD. And this is one of the reasons why we adopted Figma as a web prototyping tool.
In this article we are going to see how to organize the work in Figma. Actually there is no “official way” to organize projects in this tool: Figma offers functionalities that everyone can use in his own way. So we do not intend to explain how projects should be organized, but to share with you how the way we do it has given us good results, in case it is useful to you too in your day to day. Let’s start!
Teams, Clients, and Projects
One of the most convenient ways to structure work is through hierarchical levels where each level serves as a container for all the levels below it. To draw a comparison, it’s like seeing each of these levels as boxes that can be stored inside one another. This is the methodology we have used to organize our projects in Figma.
The first level in Figma are the teams, which as you would expect, are groups of users. We only have one team made up of everyone currently working at the studio. Our team could therefore be seen as a large box that can only be opened by those who are part of the team.
It may seem unnecessary to have more than one team at first, but this functionality can be very useful, for example, if you work with external freelance collaborators. In this way, other teams can be created - in which members of the ‘official’ team can also be present - and they can be given access only to certain projects, those on which they are working.
Inside our large team box, Figma gives the possibility of creating a second level called ‘projects’, although we prefer to refer them as ‘clients’. Why? Because for some clients we only carry out one project, but in most cases, we manage several projects for the same client, sometimes one after the other, but sometimes we even do it at the same time.
This means that as the number of projects increases the difficulty in finding them increases too. That’s why we believe it’s very important to have this first level of grouping by clients. Thus, in our large team box, we have as many boxes as clients with whom we work.
Finally, Figma allows you to create as many design files within a single project as you want. This is the level where we really define the projects. A project is for us any work that a client requests from us and that has a certain autonomy of its own: it can be a website, a web application, a mailing campaign, or a landing page…
Layers
A web design project is not limited to a prototype. Although it is the most important part, there is a lot of previous material that makes it possible, but usually most prototyping tools ignore this reality, so you have to find a way to store all this material in an alternative place and outside the tool itself. But this doesn’t happen in Figma… Within the design files we find the levels (layers), which provides huge flexibility to create as many new ‘boxes’ as we want to organize all the work material for our project internally.
For example, for each project we create six sections, grouped into three blocks according to the phases of the project: kick-off phase (where we will find the cover, client documentation, and visual research), development phase (with wireframes and the design system) and delivery phase (with final prototypes and their components).
Whenever we generate a new project, the person in charge of doing so must always create this same structure of ‘boxes’, regardless of whether they are going to be used initially or not. This allows us to always know where we should store each thing and - most importantly - where to go to find something a colleague has done. But let’s look at each of these sections in more detail.
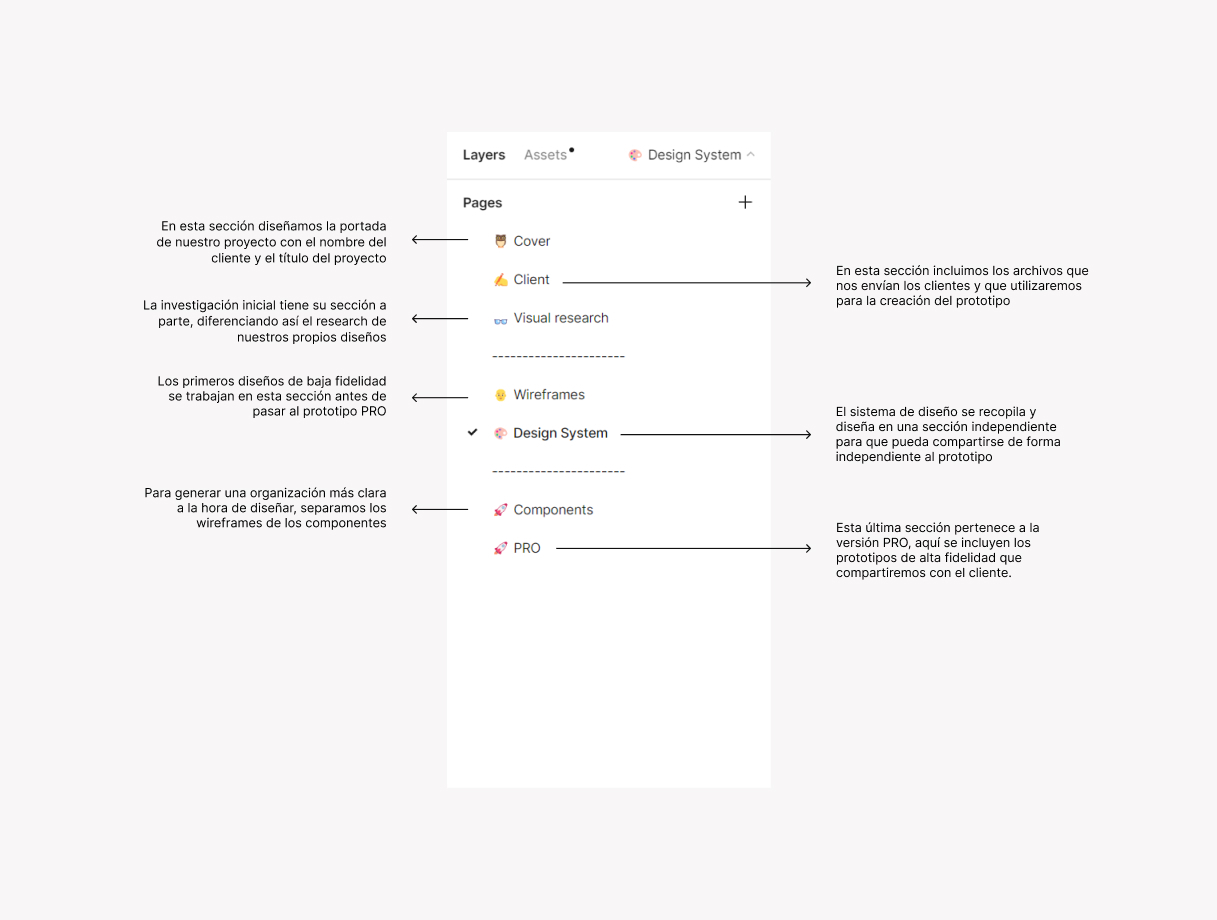
The Cover
Almost as if it were a ritual, at OKB we always start our projects in Figma by designing a cover. It is a very simple step that marks the official start of a new project and, beyond its symbolism, it is very useful. Because Figma gives some importance to this first document at the beginning of a design file, as it is what is shown as a thumbnail in their listings. That’s why it’s very practical to have a cover that remains immutable throughout the project development, helping us to locate it quickly and without error by all team members.
Client Documentation
Projects don’t come out of nowhere. They begin with a briefing in which clients explain their needs, share their aspirations, or even impose their conditions. All of this is essential for the creation of our prototype, so it is important to always have it on hand. Therefore, in a second ‘box’ of our project we include all the material that the client has initially passed to us. In many cases, these are usually a list of requirements, but we also find some images or screenshots.
Visual Research
This is our personal space, our little laboratory where before we start the design phase we carry out team brainstorming to collect all our ideas and materialize them into concrete things. That’s why we organize all this space as a clipping, where we hang different content that suggests something useful for the project: a color palette that inspires us, a typography that might fit well, photographs or icons we like, a claim that might serve as a reference or a screenshot of a site that we found interesting… Anything goes.
This is not a place to start creating prototypes, but a place to experiment and where everyone can make his own big little contribution to the project. It’s very useful to have all this content always on hand, right next to the same place where we are creating our prototypes, as at any moment you can go back to it in search of inspiration.
Wireframes
We leave behind the kick-off phase and, once we start to have clear our ideas, we start with the design. The first step is the sketches of the prototypes or wireframes. Wireframes are diagrams in which we define the structure and functionality of each web page. They are pure usability: more aesthetic elements such as images, colors, or typographies do not yet come into play here, and the elements that are included do so only to represent concepts. For example, buttons are abstractions that represent the concept of a button itself: later we will define its final appearance (size, color, whether it will have round or straight borders…)
We quickly start to dimension the project (how the content is going to be structured, how many pages we are going to need, what each one of them is going to be called…), we understand how its navigation is going to be and above all we get a first idea of what elements we are going to need to design: buttons, modal windows, tabs, accordions, avatars, cards, forms, titles… and this inventory of elements leads us to the next point…
Design System
A design system is like a set of Lego pieces, with which we are going to assemble each of the pages of our project. Here we already define aspects such as the color palette, typography or grid and we start to create all the pieces that repeat throughout the site or web application that we have previously identified with the wireframes, now with the final appearance they will have: colors, typographies, pixel sizes… We create the design system in a ‘box’ separate from the project so that we can share it with the client independently of the prototypes.
Prototypes
And we reach the last of our sections, the most important one because it receives all the work from the rest of the sections and because it is also the one that is shared with the client. It is about the high-definition navigable prototype (mockup) that collects all the pages of the site or application that we are designing, linking them together to simulate what the final product will be and so that both clients and the development team (who will work with these prototypes to turn them into code) get a precise idea of its operation and navigation.
It should be noted that we generally do not share the editable Figma document with clients, but its preview. Therefore, in these prototypes we always create a first frame (or workspace) that we call ‘Start’ and that will act as a start screen when clients access the prototype. This screen can be used to give them usage instructions and to link to different versions of the same prototype (for example, because a client wants to do a test with a different color palette).
Unifying Work Techniques
Finally, when we talk about order, we not only refer to the way we organize the files. Order also affects the way we work with them. Thus, every member of the team should be able to access a file that a colleague has already been working on, continue with their work at any point and then drop it so that a third party can pick it up, without that being a problem.
Therefore, it is important to agree among all members some basic work practices: how and when to use autolayout, always use the style library instead of applying them directly on the elements, name the components following the same logic…
This is how we organize our projects in Figma. We hope you have found it useful. You can follow the same logic that we have used in the studio, you can adapt it to better fit your work methodology or you can create another one that is more practical for your day to day. But what is really important is that you always apply some organization techniques that allow you to work faster and as a team and that above all make it easier for you to share your projects in a much more professional way with your clients. Because order can be one of the most important assets of your business, just as the lack of it can become one of your heaviest burdens.
Did you find this post interesting? Share it!
Your contacts will like to read it, for sure!


